Getting a custom model from Blender into Source Filmmaker can be surprisingly frustrating. The mesh may look perfect in your 3D software, yet SFM shows an invisible model, purple-and-black textures, broken bones, or a compile error that seems to explain nothing.
That is where sfm compile comes in.
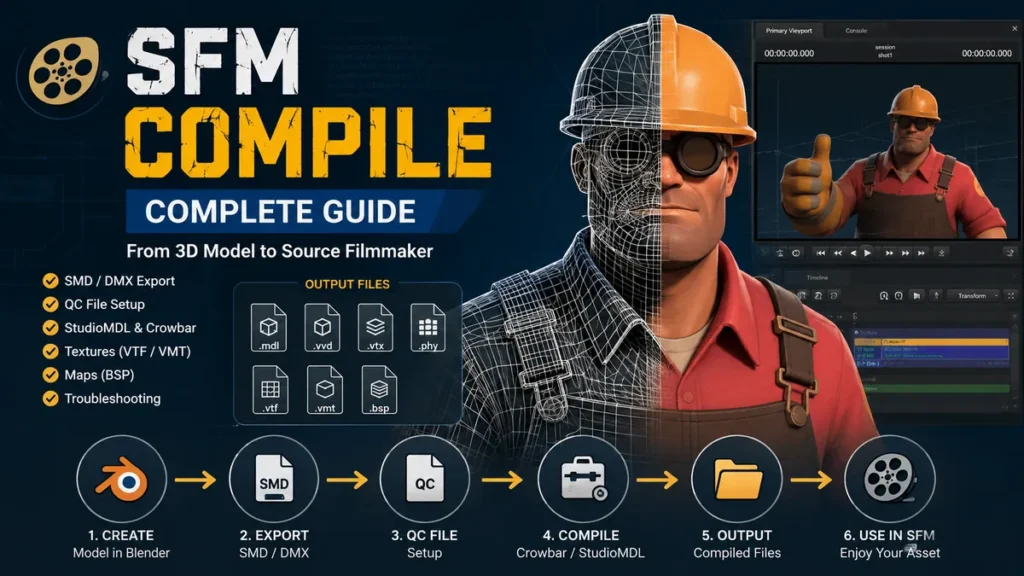
SFM compile is the process of converting raw models, animations, textures, and maps into Source Engine-compatible files that Source Filmmaker can load. For models, this normally means exporting SMD or DMX files, defining them with a QC script, and using StudioMDL—often through Crowbar—to generate MDL and supporting model files.
Once you understand what each file does, compilation becomes much less mysterious. This guide explains the complete workflow, the tools involved, the folder structure, and the errors that commonly stop custom assets from working.
What Is SFM Compile?
SFM compile is essentially a conversion or build process.
A model created in software such as Blender or Maya is not automatically in the format expected by Source Filmmaker. Raw geometry, skeletons, animations, material references, and other information need to be prepared and converted into Source Engine formats.
For model compilation, a typical workflow looks like this:
3D model → SMD/DMX export → QC script → StudioMDL/Crowbar → MDL + supporting files → Source Filmmaker
This distinction matters because Source Filmmaker does not simply treat an FBX or OBJ file like a modern general-purpose 3D package would.
The compiler takes your source files and builds an asset specifically structured for the Source engine. Current guides consistently identify SMD/DMX, QC, StudioMDL, Crowbar, MDL, VVD, VTX, VTF, and VMT as core parts of this pipeline.
What Files Does Compilation Produce?
A compiled model is usually more than one file.
| File | Purpose |
|---|---|
.mdl | Main compiled model and metadata |
.vvd | Vertex information used by the model |
.vtx | Optimized mesh/rendering information |
.phy | Physics/collision information when applicable |
.vtf | Valve Texture Format texture |
.vmt | Material definition that tells Source how to use a texture |
.bsp | Compiled Source map |
The files work together. Copying only an MDL while leaving its associated VVD or VTX files behind can result in a model that fails to load properly.
Textures are handled separately through the Source material system. They normally use VTF texture files and VMT material definitions.
Why SFM Compile Is Necessary
Compilation exists because the Source engine expects assets in its own runtime formats.
Suppose you create a character in Blender. The project contains information such as:
- mesh geometry
- UV coordinates
- bones
- vertex weights
- material assignments
- animations
- collision geometry
Those elements still need to be translated into a structure Source Filmmaker understands.
This is why simply moving a .blend, .fbx, or .obj file into an SFM directory does not create a usable Source model.
Compilation connects your content-creation software with the Source engine.
It also gives you control over things that are not necessarily stored in the mesh itself, including model paths, material directories, animation sequences, collision models, body groups, and other model behavior.
The QC file is particularly important here because it acts as the build instructions for StudioMDL.
Tools You Need for SFM Compile
You do not need a huge collection of applications, but a few tools make the workflow considerably easier.
Source Filmmaker
Source Filmmaker is Valve’s Source-engine filmmaking environment and is where the finished compiled asset will ultimately be tested and used.
Your SFM installation also provides the Source-side tools and directories involved in the workflow.
Blender
Blender is commonly used for:
- editing meshes
- creating or adjusting UV maps
- rigging characters
- correcting bone weights
- preparing animations
- exporting source model data
For Source workflows, an appropriate Source export add-on can be used to generate SMD or DMX files.
Blender Source Tools
Blender Source Tools provides Source-oriented import/export functionality for Blender.
Before exporting, check your model carefully. Problems with transforms, skeletons, material assignments, or mesh structure are much easier to correct in Blender than after compilation.
StudioMDL
studiomdl.exe is the actual Source model compiler.
It reads the instructions contained in a QC file and processes the referenced source assets to produce the compiled model.
You can invoke StudioMDL directly, but many creators prefer using a graphical front end.
Crowbar
Crowbar is widely used in Source modding workflows because it provides a GUI around model compiling and decompiling tasks.
Instead of manually constructing command-line operations every time, you can select your game configuration and QC file, run the compiler, and inspect its output log.
The underlying compilation process still depends on the appropriate Source tools; Crowbar simply makes that process easier to manage.
VTF and Material Tools
Source materials commonly rely on:
.vtffor texture data.vmtfor material definitions
Tools such as VTFEdit have traditionally been used to prepare VTF files.
Model compilation and texture preparation are related but separate parts of the pipeline. A successful model compile does not automatically guarantee that your materials are configured correctly.
How to SFM Compile a Model Step by Step
A reliable workflow is more valuable than repeatedly changing settings until something works.
The following sequence keeps the different parts of compilation organized.
Step 1: Prepare the Model
Start in your 3D application.
Inspect the model before exporting anything.
Check:
- mesh geometry
- UV mapping
- armature and bones
- vertex weights
- material assignments
- scale and orientation
- transforms
- animation data, if required
For Blender workflows, applying the necessary transforms before export can prevent orientation and scaling problems later.
Character models require extra attention because an apparently small skeleton or weighting problem can produce distorted poses once the model is inside SFM.
A simple prop is therefore a useful first compilation project.
Step 2: Export the Model as SMD or DMX
After preparation, export the Source-compatible data.
SMD has long been common in Source model workflows. DMX can also carry Source-related model and animation information.
Depending on the project, you may export separate files for:
- reference mesh
- physics mesh
- idle animation
- walk animation
- additional animation sequences
Keep the source directory organized.
For example:
sfm_project/
├── model.qc
├── model_ref.smd
├── model_phys.smd
├── idle.smd
├── walk.smd
└── textures/
A clean structure makes QC errors much easier to diagnose.
Understanding the QC File
The QC file is one of the most important pieces of the entire sfm compile workflow.
It is a plain-text script that tells the model compiler what it needs to build.
A basic example could look like:
$modelname "custom/example_model.mdl"

$body "body" "example_model.smd"

$cdmaterials "models/custom/example_model"

$sequence "idle" "idle.smd" fps 30 loop
Each instruction has a specific purpose.
$modelname
This determines the model’s compiled path and filename.
For example:
$modelname "custom/example_model.mdl"
The final asset would be referenced under that model path inside SFM.
$body
This tells the compiler which source mesh should become part of the model.
$body "body" "example_model.smd"
More complex models may use different QC commands depending on their body and bodygroup requirements.
$cdmaterials
This tells Source where the model should look for its materials.
$cdmaterials "models/custom/example_model"
A mismatch between the QC material path, VMT location, and material name is a common reason a correctly compiled model displays missing textures.
$sequence
Sequences define animation data.
For example:
$sequence "idle" "idle.smd" fps 30 loop
A character can have numerous sequences, while a simple static prop may need only minimal sequence information.
$collisionmodel
Models requiring physics can reference a separate collision mesh.
A simplified example is:
$collisionmodel "example_model_phys.smd"
{
    $mass 10
}
Collision geometry should generally be simpler than the visible render mesh.
Compile the QC File with Crowbar
Once the model and QC file are ready, you can run the actual compilation.
A typical Crowbar workflow is:
- Open Crowbar.
- Go to its model compilation section.
- Select the correct Source Filmmaker game configuration.
- Select your
.qcfile. - Confirm the relevant paths.
- Start the compile.
- Read the compiler log carefully.
Crowbar passes the necessary information to the Source model compiler, which processes the QC instructions and source files. A successful build produces the MDL and associated model files needed by SFM.
Do not close the log immediately just because files were generated.
Warnings can reveal problems that are not obvious until you pose, animate, or light the model.
Compiling with StudioMDL Directly
Crowbar is convenient, but understanding StudioMDL itself helps when troubleshooting.
StudioMDL can be run through the command line with a QC file as its input.
Conceptually, the operation is:
studiomdl.exe path\to\model.qc
The exact paths depend on your installation and configuration.
Direct compilation is useful because the console output can expose detailed information about missing files, invalid QC commands, mesh limits, materials, bones, and other problems.
If Crowbar appears to fail mysteriously, studying the StudioMDL output is often more useful than repeatedly clicking Compile.
How Textures Work After SFM Compile
A model can compile perfectly and still appear purple, black, or checkerboard-patterned.
That is usually a material problem rather than a model compilation failure.
Source uses its own material system.
The typical relationship is:
image texture → VTF → VMT → model material reference
VTF Files
VTF stands for Valve Texture Format.
Your source texture may begin as PNG, TGA, or another image format, but Source commonly uses VTF for the runtime texture.
VMT Files
A VMT is a text-based material definition.
A simple model material may resemble:
"VertexLitGeneric"
{
    "$basetexture" "models/custom/example_model/diffuse"
}
The $basetexture value points to the texture path relative to the Source materials directory rather than being an ordinary Windows file path.
That difference causes many beginner mistakes.
Current SFM compilation guides also distinguish model compilation through StudioMDL/Crowbar from texture conversion and VMT material configuration.
Recommended SFM Folder Organization
A predictable folder structure saves a surprising amount of debugging time.
For installed model assets, you may conceptually have:
game/
└── usermod/
    ├── models/
    │   └── custom/
    │       └── example_model/
    │           ├── example_model.mdl
    │           ├── example_model.vvd
    │           └── example_model.vtx
    │
    └── materials/
        └── models/
            └── custom/
                └── example_model/
                    ├── diffuse.vtf
                    └── diffuse.vmt
The important point is not the word custom. You can organize your own content differently.
What matters is consistency between:
$modelname$cdmaterials- material names
- VMT references
- actual model directories
- actual material directories
When one of these disagrees with the others, SFM may not find the asset you expect.
Common SFM Compile Errors and How to Fix Them
Compilation problems become easier to solve when you identify which stage of the pipeline is actually failing.
Model Does Not Appear in SFM
First verify that all generated model files are in the correct model directory.
Do not check only for the .mdl.
Confirm the supporting VVD and VTX files are present as well.
Then inspect the $modelname path in the QC and confirm that you are searching the appropriate model location in SFM.
Purple or Missing Textures
This usually points to the material pipeline.
Check:
- Does the VTF exist?
- Does the VMT exist?
- Is
$basetexturecorrect? - Does
$cdmaterialspoint to the intended material folder? - Does the model reference the expected material name?
- Are the material files inside the appropriate Source content directory?
Do not immediately recompile the entire mesh when the real problem is simply a material path.
Model Is Invisible
An invisible model can have several causes.
Inspect the compile log first, then verify the mesh export, scale, file placement, and QC references.
If the model exists but is extremely small or far from where you expect it, the problem may have originated in your 3D application’s transform or scale setup.
Model Is Rotated or Has the Wrong Scale
Return to your source project and inspect transforms.
In Blender, unapplied scale or rotation can create confusing results during export.
Correct the source asset, export again, and recompile rather than trying to compensate for every issue after the model reaches SFM.
Broken Skeleton or Deformed Character
A successful compile does not guarantee a healthy rig.
Check:
- bone hierarchy
- vertex weights
- exported skeleton
- animation skeleton
- bone names
- armature transforms
If the reference mesh and animation were exported using incompatible skeleton states, poses can behave unexpectedly.
QC File Cannot Find an SMD
This is normally a path or filename problem.
Check the referenced filename carefully and verify that the source file actually exists where the QC expects it.
Short, predictable working directories can also make the process easier to troubleshoot.
Crowbar Compilation Fails
Read the output log from the beginning of the failure, not just its final line.
Look for the first meaningful error.
A later error may simply be a consequence of something that failed earlier.
Typical causes include:
- invalid QC syntax
- missing source files
- incorrect compiler configuration
- wrong game path
- malformed mesh data
- material or file path mistakes
- problematic skeleton data
The compiler log should be treated as diagnostic information rather than background noise.
SFM Compile for Animations
The same general model pipeline can also incorporate animation sequences.
Animations are normally exported from the 3D package and referenced by the QC script.
For example:
$sequence "idle" "idle.smd" fps 30 loop
$sequence "walk" "walk.smd" fps 30
$sequence "run" "run.smd" fps 30
After compilation, those sequences become associated with the compiled model.
For reliable results, animation exports need to use the expected skeleton. If the bone structure changes between your reference model and animation files, the resulting motion may be incorrect.
Current competitor guides consistently describe SMD/DMX animation exports and QC $sequence definitions as part of the Source model compilation pipeline.
SFM Compile for Maps
Models are not the only assets that use a compilation stage.
Source maps follow a different pipeline.
A map is generally created as a VMF in Hammer and compiled into a BSP that the engine can load.
The traditional Source map compilation process uses three major tools:
- VBSP — processes the map geometry and builds the BSP structure.
- VVIS — calculates visibility information.
- VRAD — calculates map lighting.
So the simplified pipeline becomes:
VMF → VBSP → VVIS → VRAD → BSP
This is separate from model compilation with StudioMDL.
Understanding the distinction prevents a common misconception: there is no single universal “compile” operation that processes every kind of SFM content in exactly the same way. Models and maps use different build pipelines.
Is Rendering a Movie the Same as SFM Compile?
Not exactly.
The word “compile” is sometimes used loosely by SFM users to describe producing a finished animation, but technically the processes should be separated.
Asset compilation converts source assets into Source-compatible runtime formats.
Examples include:
- SMD/DMX → compiled model
- VMF → BSP
- image source → VTF
Rendering or movie export, by contrast, turns your SFM scene into final visual output such as frames or video.
Some search results use “SFM compile” for both asset compilation and final movie export, which can make beginner tutorials confusing.
If your problem is that a Blender character will not appear in Source Filmmaker, you are dealing with asset compilation, not movie rendering.
Crowbar vs. StudioMDL: Which Should You Use?
They are not really competing compilers in the usual sense.
| Feature | Crowbar | StudioMDL |
|---|---|---|
| Interface | Graphical | Command line |
| Beginner friendly | Higher | Lower |
| QC compilation workflow | Yes | Yes |
| Detailed compiler output | Accessible through interface | Direct console output |
| Good for repeated work | Yes | Yes |
| Useful for learning internals | Moderate | High |
Crowbar is usually easier when you are starting because it simplifies configuration and execution.
StudioMDL knowledge becomes useful when you need deeper troubleshooting or want to understand what Crowbar is doing behind the interface.
A practical approach is to use Crowbar for convenience but learn how to read StudioMDL output.
Practical Tips for More Reliable Compiles
Most compilation problems are not solved by adding more tools. They are solved by making the workflow predictable.
Start with a Simple Prop
Do not make your first project a complex character with dozens of bones, materials, bodygroups, flexes, and animation sequences.
Compile a basic static prop first.
Once that works, add complexity gradually.
Change One Thing at a Time
If compilation fails and you simultaneously rewrite the QC, move the folders, rename the textures, modify the rig, and change Crowbar settings, you will not know which change fixed—or broke—the project.
Change one variable, compile again, and check the log.
Keep a Known-Good QC Template
Once a basic model compiles successfully, keep a clean copy of that project’s QC structure.
It provides a reliable starting point for future assets.
Separate Source Files from Compiled Files
Keep editable/exported source files in a dedicated workspace.
Treat the SFM model and material directories as the destination for runtime assets.
This makes it easier to identify what belongs to the build process and what belongs to the final installation.
Test Immediately
After a successful compile, open SFM and inspect the model.
Check:
- scale
- orientation
- materials
- bones
- posing
- animations
- bodygroups
- physics behavior where relevant
A compiler saying “success” means the asset was built. It does not necessarily mean every artistic and technical component behaves exactly as intended.
A Better Troubleshooting Workflow
When something fails, work through the pipeline in order instead of guessing.
1. Check the source model
Does it look and behave correctly in Blender or your chosen 3D software?
2. Check the export
Were the intended mesh, bones, and animations exported correctly?
3. Check the QC
Do all filenames, model paths, material directories, and sequences point to the right files?
4. Check the compiler log
Find the first meaningful warning or error.
5. Check generated files
Confirm the expected MDL, VVD, VTX, and any required PHY files were created.
6. Check materials
Verify VMT and VTF files and their paths.
7. Test inside SFM
Only after the previous stages are correct should you focus on SFM-specific display or posing problems.
This approach turns compilation from trial-and-error into a repeatable diagnostic process.
SFM Compile Workflow at a Glance
For a custom model, the complete process can be reduced to:
- Prepare the model in Blender or another compatible 3D application.
- Correct transforms, UVs, rigging, and material assignments.
- Export the mesh and animations as SMD or DMX.
- Prepare Source-compatible textures.
- Create VTF textures and VMT material definitions.
- Write a QC script.
- Configure Crowbar for Source Filmmaker.
- Compile the QC through StudioMDL.
- Inspect the compiler log.
- Verify MDL, VVD, VTX, and optional PHY outputs.
- Put model and material assets in their correct directories.
- Open Source Filmmaker and test the asset.
That basic sequence is reflected across current guides covering Source Filmmaker model compilation.
Final Thoughts on SFM Compile
SFM compile looks complicated mainly because several separate systems meet at the same point: 3D modeling, Source exports, QC scripting, StudioMDL, Crowbar, VTF textures, VMT materials, animation sequences, physics data, and Source Filmmaker’s directory structure.
Once those responsibilities are separated, the process becomes much easier to understand.
Prepare the source model correctly, export clean SMD or DMX files, keep the QC paths consistent, use Crowbar or StudioMDL to build the model, read the compiler log instead of ignoring it, and verify your materials separately.
For maps, remember that the workflow changes to VMF and the VBSP/VVIS/VRAD toolchain rather than StudioMDL. For final movies, rendering is a separate stage again.
Master those distinctions and sfm compile stops being a mysterious technical obstacle. It becomes a predictable build process you can repeat whenever you want to bring custom models, animations, props, or environments into Source Filmmaker.