Tying a necktie can feel surprisingly difficult when you’re getting ready for a job interview, wedding, business meeting, or formal event. One end looks too long, the knot sits crooked, or you finish only to discover that the tie barely reaches your shirt buttons.
The good news? You don’t need to master complicated techniques to look polished.
To tie a tie, place it around your neck with the wide end longer than the narrow end. Cross the wide end over the narrow end, wrap it around, bring it through the neck loop, and pull it down through the front knot. Tighten and adjust until the tie sits neatly at your collar.
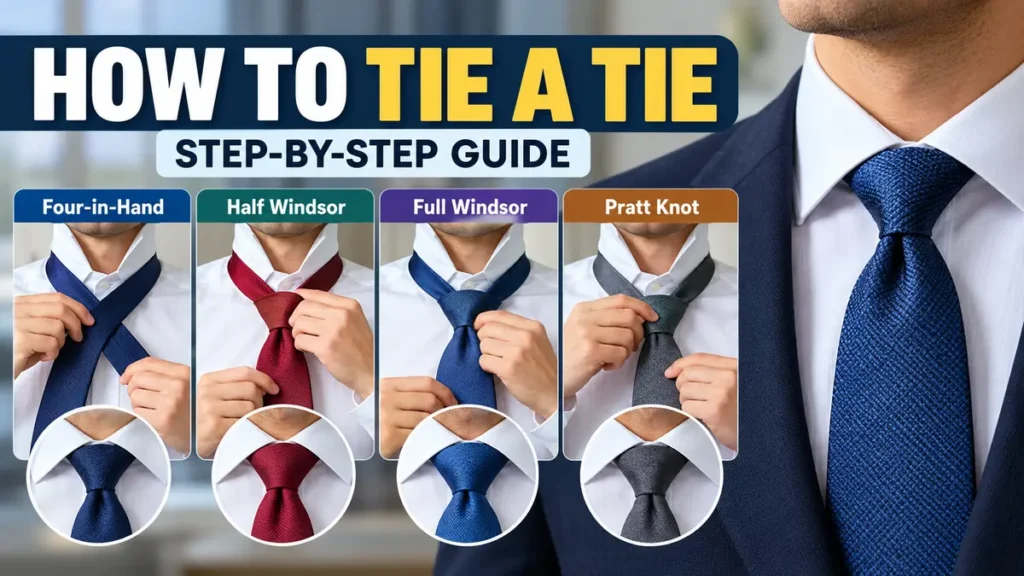
That basic sequence describes the popular Four-in-Hand knot. Other styles, including the Half Windsor, Full Windsor, and Pratt knot, use slightly different folds to create different shapes.
This guide explains each method, how to choose the right knot for your shirt collar, and how to fix the most common problems.
How to Tie a Tie Using the Four-in-Hand Knot
The Four-in-Hand is one of the easiest necktie knots to learn. It creates a slim, slightly asymmetrical knot that works with most everyday shirts.
It’s particularly useful when you’re in a hurry or wearing a tie made from thicker fabric.
Step-by-step Four-in-Hand instructions
- Position the tie. Stand in front of a mirror with your collar raised and the top shirt button fastened. Place the tie around your neck with the wide end on your right and the narrow end on your left. The wide end should hang roughly 12 inches (30 cm) lower, although the exact difference depends on your height and tie length.
- Cross the wide end over the narrow end. Hold the crossing point just below your collar.
- Wrap underneath. Pass the wide end behind the narrow end from right to left.
- Bring it across the front. Move the wide end horizontally over the narrow end, creating the visible front band of the knot.
- Pull through the neck loop. Bring the wide end upward from underneath through the opening around your neck.
- Thread through the front loop. Slide the wide end downward through the horizontal band you created in step four.
- Tighten the knot. Hold the narrow end while gently pulling the wide end downward. Slide the knot upward until it rests comfortably against your collar.
Quick takeaway: The Four-in-Hand is an excellent first knot because it requires relatively few movements and works for both casual and professional outfits.
When should you use a Four-in-Hand knot?
This knot is particularly suitable for:
- Everyday office wear and business-casual clothing
- Narrow and traditional point collars
- Wool, knitted, and thicker silk ties
- People who prefer a smaller knot
- Longer ties that need a knot using relatively little fabric
The finished knot is not perfectly symmetrical. That’s a characteristic of the style rather than a mistake.
How to Tie a Tie With a Half Windsor Knot
The Half Windsor creates a more balanced, triangular knot than the Four-in-Hand. Despite its name, it isn’t simply half the steps of a Full Windsor.
It’s a versatile choice for business presentations, graduation ceremonies, weddings, and formal dinners.
Half Windsor step-by-step instructions
- Place the tie around your neck with the wide end on your right, hanging approximately 12–14 inches lower than the narrow end as an initial guide.
- Cross the wide end over the narrow end toward your left.
- Bring the wide end behind the narrow end toward your right.
- Lift the wide end toward the neck opening, then pass it downward through the loop on the right side.
- Bring the wide end across the front of the knot from right to left.
- Pull the wide end upward through the neck loop from underneath.
- Feed the wide end downward through the front horizontal loop.
- Tighten carefully, shape the knot, and slide it toward your collar.
The resulting knot should form a compact triangle with a relatively even appearance.
Why choose the Half Windsor?
The Half Windsor offers a useful balance between knot size and simplicity.
It pairs especially well with medium-spread collars, standard silk neckties, and formal shirts.
Compared with the Four-in-Hand, it generally consumes more tie length. If your finished tie is too short, begin with the wide end hanging lower.
How to Tie a Tie With a Full Windsor Knot
The Full Windsor, also called the Windsor knot or Double Windsor, produces a broad, symmetrical triangular shape.
It’s often associated with traditional formalwear and executive business attire. The knot is substantial, so it works best when your shirt collar has enough room to accommodate it.
Full Windsor step-by-step instructions
- Drape the tie around your neck with the wide end on your right, substantially longer than the narrow end.
- Cross the wide end over the narrow end toward the left.
- Bring the wide end upward through the neck loop from underneath, then down on your left.
- Pass the wide end behind the narrow end toward the right.
- Bring it upward toward the right side of the neck opening, then feed it downward through that opening.
- Move the wide end horizontally across the front from right to left.
- Bring the wide end upward through the neck loop from underneath.
- Feed it downward through the horizontal front loop.
- Gently tighten, shape the triangular knot, and center it beneath your collar.
Getting the Full Windsor shape right
The Full Windsor requires careful adjustment to achieve its distinctive symmetry.
Make sure the fabric lies flat as you form each wrap. Twisted layers can make the finished knot bulky or uneven.
Because the Full Windsor uses more fabric than smaller knots, a longer necktie may be necessary for taller individuals.
Is a Full Windsor appropriate for every occasion?
Not necessarily.
A large Windsor knot can overwhelm a narrow collar or look excessively bulky when made with a thick wool tie.
It generally works better with spread or cutaway collars and ties made from relatively smooth, lightweight fabric.
For everyday office clothing, a Half Windsor or Four-in-Hand may look more proportionate.
How to Tie a Tie Using the Pratt Knot
The Pratt knot, sometimes called the Shelby knot, offers another way to create a neat, moderately sized triangular knot.
Its distinguishing feature is that you begin with the tie inside out, with the seam facing outward.
Pratt knot instructions
- Place the tie around your neck with its underside facing outward. Keep the wide end on your right and lower than the narrow end.
- Cross the wide end underneath the narrow end toward the left.
- Bring the wide end upward into the neck opening and pass it downward through the loop on the left side.
- Pull gently to establish the base of the knot.
- Bring the wide end across the front from left to right.
- Lift the wide end upward through the neck loop from underneath.
- Feed it downward through the front horizontal loop.
- Tighten and slide the finished knot into position.
The visible front of the finished tie should face outward normally, despite the inside-out starting position.
What makes the Pratt knot different?
The Pratt creates a relatively tidy triangular knot without the bulk of a Full Windsor.
It can be useful for professional clothing, medium-spread collars, and ties with moderate fabric thickness.
It also provides an alternative when the Half Windsor doesn’t produce the shape or length you want.
Comparing the Four Most Popular Tie Knots
Choosing a necktie knot is easier when you understand the differences in shape, complexity, and collar compatibility.
| Tie knot | Difficulty | Knot shape | Best collar |
|---|---|---|---|
| Four-in-Hand | Easy | Slim, asymmetrical | Point, narrow |
| Half Windsor | Moderate | Medium triangle | Point, medium spread |
| Full Windsor | Moderate to advanced | Large, symmetrical triangle | Spread, cutaway |
| Pratt | Moderate | Medium, tidy triangle | Point, medium spread |
For most beginners, the Four-in-Hand is the simplest starting point. Once you’re comfortable with it, the Half Windsor is a practical next step.
A wider knot isn’t automatically more formal or better looking. The right choice depends on the collar opening, tie fabric, and proportions of your outfit.
How Long Should a Tie Be?
A properly tied necktie should generally end around the top or middle of your belt buckle.
This traditional guideline helps the tie look proportionate to your shirt, trousers, and jacket.
How to adjust your tie length
If your tie ends too high above your waistband, untie it and start again with the wide end hanging lower.
If the tie extends significantly below your belt, begin with the wide end positioned higher.
Remember that different knots consume different amounts of fabric. A Full Windsor generally requires more tie length than a Four-in-Hand.
Your height, torso length, trouser rise, and tie thickness also affect the final result.
Standard versus extra-long ties
Most standard adult neckties measure approximately 57–58 inches (145–147 cm), while extra-long versions commonly measure around 62–63 inches (157–160 cm). Exact dimensions vary by manufacturer.
Taller people or those with longer torsos may find extra-long ties more comfortable, especially when using a Full Windsor.
A shorter person may prefer a knot that uses more fabric to avoid an excessively long finished tie.
The most reliable method is to check where the wide tip falls after tying rather than relying on one universal starting measurement.
How to Make Your Tie Knot Look Perfect
Learning the movements is only part of tying a necktie. Small finishing adjustments can make an ordinary knot look noticeably better.
Create a neat tie dimple
A tie dimple is the small vertical indentation immediately beneath the knot.
It’s a traditional styling detail that gives a silk necktie a more defined, three-dimensional appearance.
To create one:
- Tie your preferred knot but leave it slightly loose.
- Place your index finger directly below the knot.
- Gently pinch the fabric inward with your thumb and middle finger.
- Maintain the fold while carefully tightening the knot.
- Remove your fingers and adjust the dimple until it looks natural.
A single centered dimple usually creates a clean appearance.
Not every material forms a lasting dimple. Thick knitted ties and some stiff synthetic fabrics may resist the fold.
Center the knot beneath your collar
The knot should rest directly below the top button of your dress shirt.
If it leans noticeably to one side, loosen it slightly and reposition the fabric.
Four-in-Hand knots naturally have some asymmetry, but the hanging tie should still appear reasonably centered.
Hide the narrow end
Many neckties have a small fabric keeper loop stitched to the back of the wide end.
After tying your knot, feed the narrow end through this loop to keep both ends aligned.
If the narrow end is too short to reach the keeper, that’s not necessarily a problem. The main goal is to prevent it from hanging visibly beside the wide end.
Adjust the collar
Once the knot is finished, fold your shirt collar down and check that both collar points sit neatly.
The knot should fill the collar opening without forcing the collar outward or creating uncomfortable pressure around your neck.
Common Mistakes When Learning How to Tie a Tie
Even experienced tie wearers occasionally end up with an uneven knot or the wrong length. Most problems come from the starting position, fabric handling, or final adjustment.
| Problem | Likely cause | How to fix it |
|---|---|---|
| Tie is too short | Wide end started too high | Begin with the wide end lower |
| Tie is too long | Wide end started too low | Begin with the wide end higher |
| Knot looks crooked | Fabric twisted during wrapping | Untie and keep each layer flat |
| Knot looks bulky | Thick fabric or oversized knot | Try a Four-in-Hand |
| Knot is too small | Thin fabric or narrow knot style | Try a Half Windsor |
| Narrow end is visible | Ends are poorly aligned | Adjust starting length and use the keeper |
| Knot feels uncomfortable | Tie tightened too firmly | Loosen slightly and reposition |
Why does my tie knot keep loosening?
A knot may loosen when its layers aren’t properly tightened or when the tie fabric is particularly smooth.
After completing the knot, hold the narrow end and carefully slide the knot upward. Then gently pull the wide end to remove slack.
Avoid yanking the tie, which can distort the fabric and place unnecessary strain on the stitching.
Why does my tie twist after tying it?
Twisting often occurs when the wide end rotates during one of the wrapping steps.
Before feeding the wide end through the final front loop, check that its visible surface faces outward and that the fabric isn’t folded underneath.
Smooth out the tie with your fingers before tightening.
Choosing the Right Knot for Your Tie and Shirt
The knot that looks best with one outfit may appear awkward with another.
Collar shape, necktie width, fabric thickness, and the formality of the occasion all influence the finished appearance.
Match the knot to your collar
A point collar has a relatively narrow opening between its collar points. A slim Four-in-Hand usually fits comfortably within that space.
A spread collar has a wider opening, making it suitable for a Half Windsor or Full Windsor.
A cutaway collar has an especially wide spread. A substantial Windsor knot can help fill the open area.
Button-down collars are often worn with smaller, less structured knots, particularly in business-casual settings.
These are styling guidelines rather than strict rules. Your personal proportions and the shape of the finished knot matter more than following a single formula.
Consider the tie fabric
Long Navy Herringbone Silk Tie | Turnbull & Asser – Turnbull & Asser UK
Silk ties
Smooth, flexible silk works with most classic knots. It is particularly suitable for creating a neat dimple.
Navy Blue Knitted Tie | In stock! | Tailor Toki
Knitted ties
Their textured construction generally looks better with smaller knots, especially the Four-in-Hand.
Corbata de lana de cachemira pura marrón | ¡En stock! | Tailor Toki
Wool ties
Thick wool creates substantial knots. A simpler tying method helps prevent excessive bulk.
NON-IRONウォッシャブルタイ 無地|O50_62BWMJWN5 – ORIHICA 公式通販
Polyester ties
Synthetic fabrics vary in stiffness and texture. Experiment with a Four-in-Hand or Half Windsor to find the best shape.
What knot should you wear to a job interview?
A Four-in-Hand or Half Windsor is usually a dependable choice for a job interview.
Both can look professional when paired with a clean dress shirt, properly fitted suit, and restrained tie pattern.
A Full Windsor may also work, particularly with a spread-collar shirt and traditional business attire.
The most important consideration is neatness. A correctly tied simple knot generally looks better than a complicated knot that is poorly shaped.
What knot works best for weddings?
For most weddings, a Half Windsor offers a balanced appearance without excessive bulk.
A Full Windsor can complement a more formal suit and wide-collar shirt.
For a relaxed daytime wedding, a Four-in-Hand with a textured tie may be entirely appropriate.
Black-tie events are different: a traditional tuxedo is normally worn with a bow tie rather than a standard long necktie.
How to Tie a Tie Without a Mirror
A mirror makes learning easier, but once you understand the sequence, you can tie a necktie using your hands and the feel of the fabric.
The Four-in-Hand is particularly useful for this.
Start by placing the tie around your neck and checking that the wide end hangs lower than the narrow end.
Then remember the basic movement pattern:
Over → Behind → Across → Up → Down
Cross the wide end over the narrow end, wrap it behind, bring it across the front, lift it through the neck opening, and feed it down through the front loop.
Once the knot is formed, use your fingers to check that the front band lies flat.
Slide the knot toward your collar, then feel whether the wide end hangs straight down the center of your shirt.
You can check the final length when a mirror becomes available.
Can you tie a necktie with one hand?
Tying a conventional necktie with one hand is possible using adapted techniques, but it is substantially more difficult than the standard two-handed method.
A pre-tied necktie or a specially designed adaptive tie may be a practical alternative for someone with limited hand mobility.
For most beginners, using both hands and a mirror is the easiest way to develop consistent technique.
How to Untie and Care for a Necktie
Learning to remove a tie correctly is just as useful as learning to tie one.
Pulling the narrow end forcefully through a tightened knot can place unnecessary stress on the fabric.
Instead, loosen the knot gently and reverse the tying movements until the tie is completely undone.
Should you leave a tie knotted?
It’s generally better to untie a conventional necktie after wearing it.
Leaving the knot in place can create persistent creases, particularly in delicate silk fabrics.
After untying, allow the tie to hang freely so the material can recover its shape.
How should you store ties?
Hang ties on a suitable rack or roll them loosely for drawer storage.
Avoid sharp folds and heavy objects that can compress the fabric.
For travel, a tie case or loosely rolled tie can help minimize wrinkles.
Always follow the care instructions on the label. Many silk ties require specialist cleaning rather than machine washing.
How Long Does It Take to Learn How to Tie a Tie?
Most people can understand the Four-in-Hand sequence after a few attempts. Becoming comfortable enough to tie it without concentrating on every movement may take several short practice sessions.
Rather than trying to memorize four knots immediately, focus on one.
Practice the same sequence several times, checking your starting length and finished knot after each attempt.
Once the Four-in-Hand feels natural, try the Half Windsor. Learning the more complicated Windsor and Pratt knots becomes easier when you’re already familiar with crossing, wrapping, and feeding the wide end through loops.
There’s no need to learn dozens of decorative knots. A small collection of reliable techniques covers nearly every everyday and formal occasion.
Final Thoughts on How to Tie a Tie
Learning how to tie a tie is a practical skill that becomes much easier with repetition.
Start with the Four-in-Hand for a simple everyday knot. Move to the Half Windsor when you want a balanced triangular shape, or use the Full Windsor for a broader knot with spread-collar shirts. The Pratt provides another versatile option.
Whichever method you choose, focus on three finishing details: keep the knot neat, center it beneath your collar, and aim for the wide tip to reach your belt buckle.
Practice with the same tie a few times before an important event. Once the movements become familiar, tying a necktie can become a quick and straightforward part of getting dressed.